Check out my makeup posts!
Showing posts with label makeup. Show all posts

What I Receieved For Christmas {ft. swatches}


Hey lovelies,

I was getting quite a few messages asking about what I was gifted for Christmas so here you go. This is in no way me showing off, but I also love reading these posts and seeing what people had at the top of their wish lists. Furthermore, I mainly asked for books and perfume instead of makeup this year, so if you want to see the books I received click here.

Products featured in pictures:

  1. Anastasia Beverly Hills Pro Series Contour Kit | Link | Shade: Light/Medium
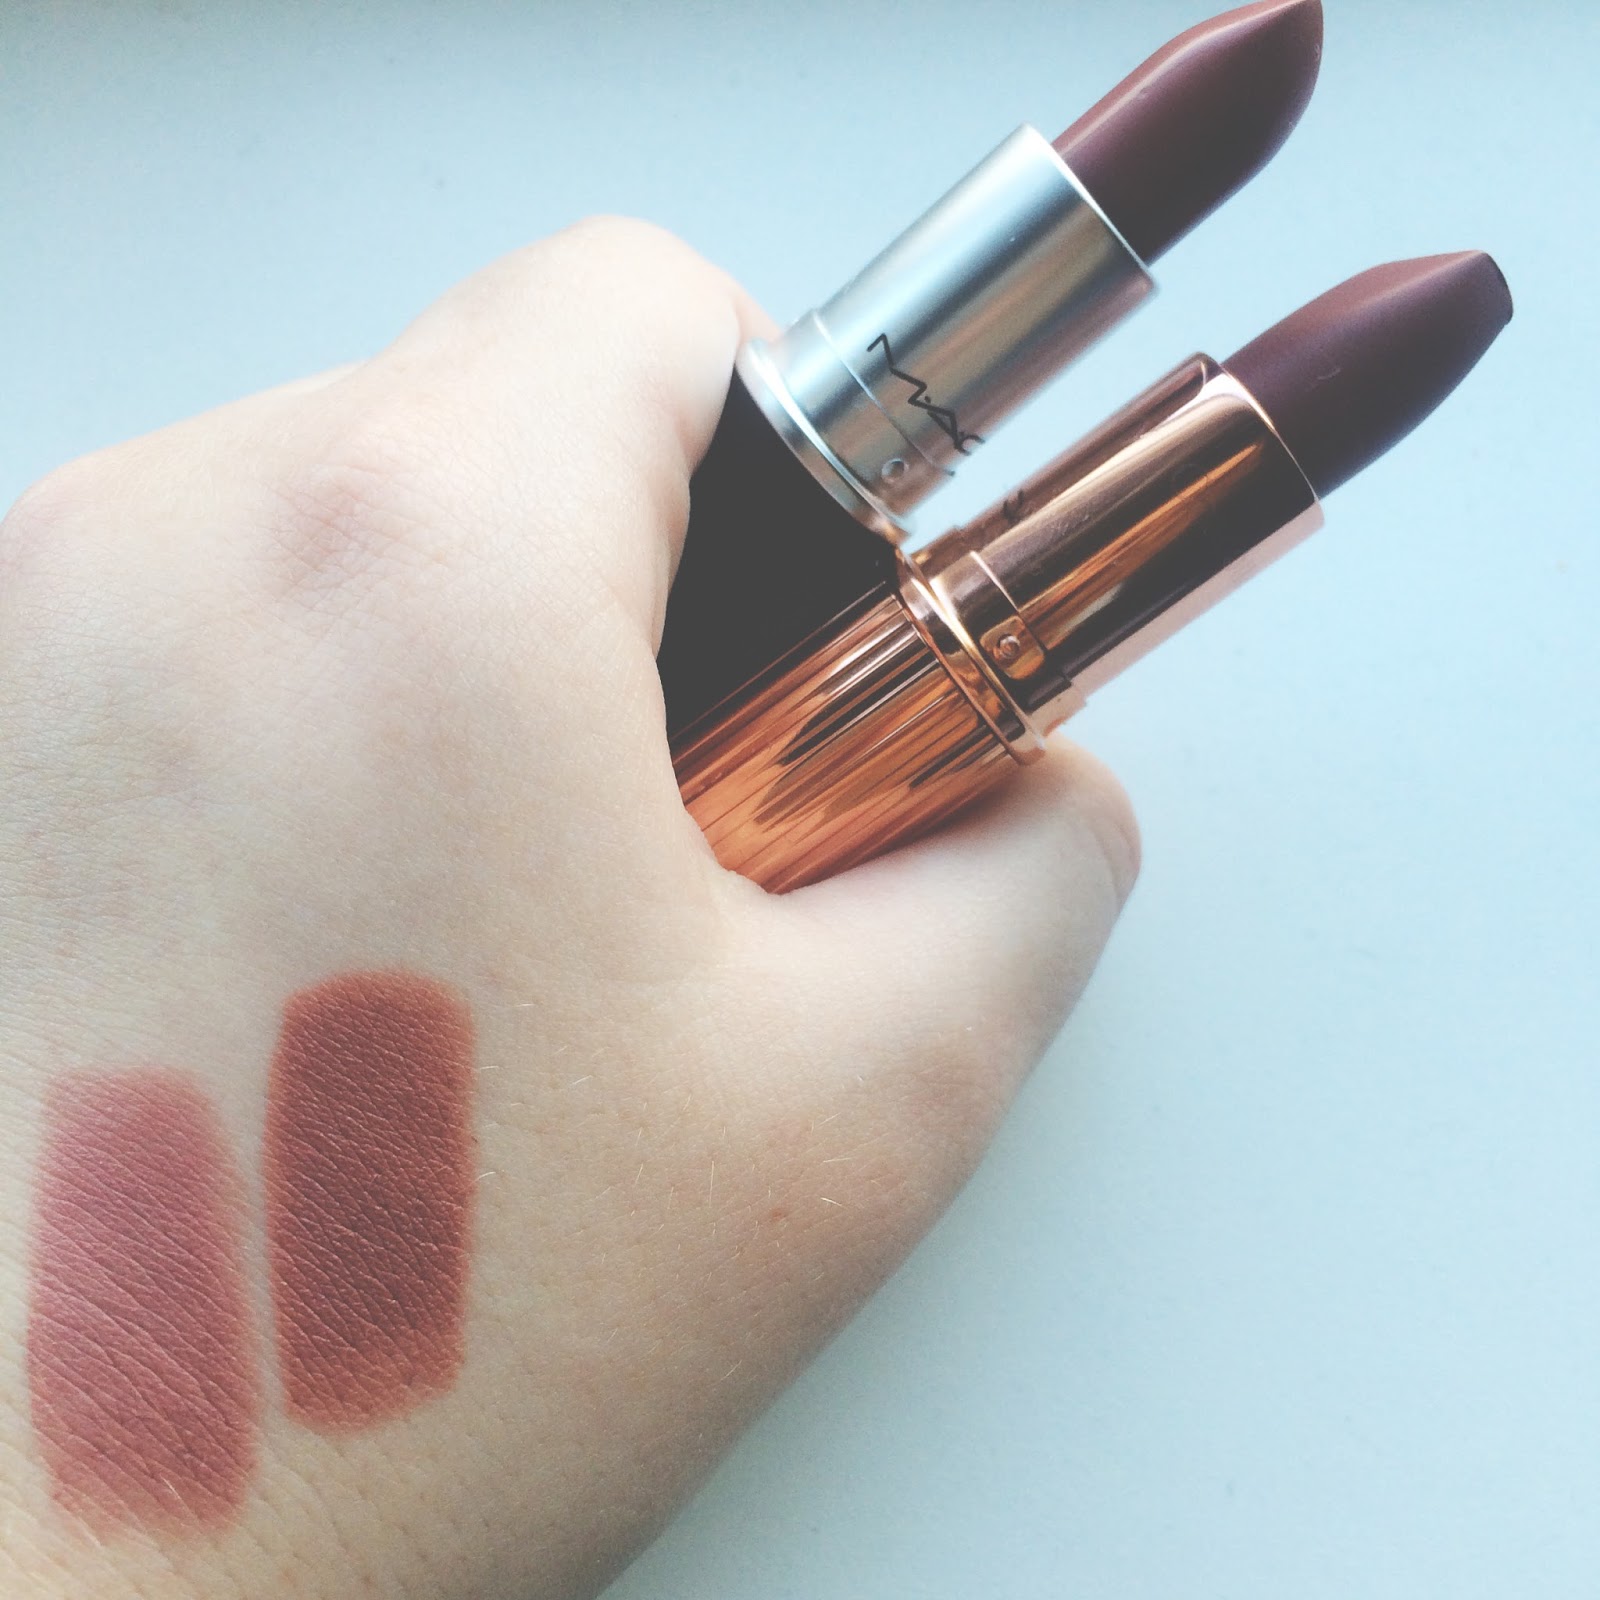
  2. MAC Lipstick | Link | Shade: Spirit
  3. Charlotte Tilbury Matte Revolution Lipstick | Link | Shade: Very Victoria
  4. Clarins Gentle Exfoliator Brightening Toner | Link
  5. Hourglass Ambient Lighting Edit | Link
Products not featured in the picture:
  1. Diptyque Candle | Link | Scent: Vanille
  2. MAC Eyeshadow | Link | Shade: Sumptuous Olive
  3. Clarins Lotus Face Treatment Oil | Link
  4. Alpha H Liquid Gold | Link
Swatches:
L-R: CT 'Very Victoria'/MAC 'Spirit'

Thanks for reading lovelies


High End Haul ft. MAC and YSL (SWATCHES)


Today I thought I'd feature a quick high end hall I did back from when I was in Norwich, I'd not bought makeup for over 2 months which is honestly shocking for me as I used to buy a new product every few days. I have been dying to get my hands on these products for so long, and after seeing a few other products I liked the look of I decided to have a little splurge! There will definitely be a review upcoming for the YSL 'Kiss and Blush' products and also my MAC lipstick collection should be posting soon as well - so keep your eyes out.


MAC
From MAC I went a bit wild and finally conquering how to line my lips without looking like a clown, I bought a few popular products amongst the beauty community. The first two were lipsticks being the popular shade 'Stone' and from the new MAC collection 'Whirl'. I also adore MAC's lip liners and could not resist buying the matching lipliner, in the shades; 'Stone' (got to match that lipstick), 'Stripdown' and 'Beurre'. 'Stripdown' is a lip liner Kylie Jenner is famous for and something I swatched in store and instantly fell in love with, much alike 'Beurre' which is a similar shade to Nars' 'Anna' audacious lipstick. 


YSL
I then went and got two of the Kiss and Blush products, after hearing so many rave reviews and seeing these two shades in real life. They-are-b-e-a-u-tiful. I got shades 9, and 10.

Swatches

L-R YSL Kiss and Blush in 9, 10, MAC Lipstick in Stone, Whirl


L-R MAC Lipstick in Stone, Whirl. MAC Lip Liner in Stone, Stripdown, Beurre
Thank you for reading,
Apologies I've been away for a while I've been moving back in to University!


Battle Of The Primers - Round 2.0 {Review}


Hey Lovelies,
I thought I'd finally get round to reviewing a second set of primers as they are one of my all time favourite beauty products! I find they make such a difference to your skin and your makeup! Furthermore, my Battle of The Primers Round 1 | Link, is one of my most popular posts on my blog so I was dying to revisit the post! Also, if you are confused on what a primer is, how to use it or any other questions they will most likely be answered on my first primer post, but if not feel free to comment below!
Also if you're wondering why there's a lot of Seventeen products I'm not sponsored by them, I find they're just really cheap and was recommended to try both of them.


Primer 1 - Seventeen Skin Wow! 3 Way Highlighter £5.99


This is described as "Use to prime, add to your foundation, or apply onto cheek bones to lift, lighten and wake up your skin with a luminous glow."
I normally use this either under my foundation or mixed in with my foundation and I adore how lightweight it feels on the skin! I also find it doesn't add to my oilness - although I normally steer clear of applying it to my t-zone and use a mattifying primer there instead. It leaves my skin with a lovely, natural glow that is perfect any time of the year and the fact you only need a tiny amount for how cheap it is, is perfect!
Although, the only issues I have with it, is beginners need to be super careful with how much you use as if you end up pumping/applying too much it can leave your face looking like a disco ball.
But besides that slight issue which can easily be resolved with time I adore this primer!
I would recommend it to anyone and everyone - especially someone with dull skin that desires a quick pick me up!

4.5/5

Primer 2 - Seventeen Flawless Poreless Primer £5.99


This is described as "Apply with fingers allowing the silky primer to create a smooth canvas ready for foundation to glide onto".
Sadly this one didn't live up to the expectations I had built it up to, as even though it's extremely cheap like the other Seventeen primer and did leave the skin smooth, soft and silky I found it didn't help foundation apply any easier than usual.
I also found it didn't help enhance lasting time of my make-up, and my t-zone only remained matte for a few hours. It also didn't really hide any of my pores and I found I had to use quite a lot of the product to see an actual difference. Furthermore, I felt it left quite a similar feeling to the Benefit primer which I reviewed previously | Link, it also reminds me of the new YSL primer that has just been released. Even more so, I didn't like the fact you have to put your finger into the product to apply it, as I find it becomes quite unsanitary and it definitely isn't great for acne/sensitive prone skin.
I wouldn't really recommend it to anyone unless you have simple, normal skin and just want a cheap, easy to use primer to help aid foundation application.

2/5

Primer 3 - Nivea Daily Essentials Hydration Primer Normal/Combo £4.99


Nivea describes this primer as being "An even and smooth base for effective make-up application; helps your make-up stay put, absorbs instantly thanks to its light texture and uses an effective hydrator for lasting moisturisation."
Overall, I really like this primer and tend to use it around the more drier, dehydrated areas of my face - e.g. my cheeks. It leaves my skin much smoother, softer and supple which prevents cakiness and has a pleasant smell all nivea products have. I also like that it has built in skincare benefits as well.
I also have pretty much 0 negative comments to say about it besides the packaging, as the fact it's a jar makes it quite bulky and heavy to carry around and also it's quite unsanitary instead of something like a squeezey tube.
Besides that, I would recommend this product to pretty much anybody, especially as Nivea has also released one for people with sensitive/dry skin types. The only type I'm not sure it would suit is extremely oily skin types.

4/5


Primer 4 - Becca Line and Pore Corrector £14.99


Becca explains this as a "non-oily primer prior under-eye concealer, eye shadow, lip-liner application. Gives soft focus effect to minimise lines and refine visible pores. Free of paraben, preservatives and fragrance."
I normally use this as a normal, all over face primer - especially focusing on my oily areas (the dreaded T-zone), as I wasn't aware that it could be used specifically for other things so I'm definitely going to give it a go in other areas. But, for what I have been using it for I've had very mixed feelings about it.
As I love that it keeps my skin matte and oil/grease free for a decent amount of time. I also like that Becca doesn't put any nasties in their product, this is especially great for me as I have sensitive skin.
But, the feel it gives is extremely silicone-ey which I don't honestly love and I also feel it doesn't do anything for my pores. If anything, I feel after a few hours they're more visible than if I hadn't used the primer in the first place. I also find its pretty expensive for how little it does.
If I were to recommend this primer to anyone it would be more normal - combination skin types, especially anyone with sensitive skin that is trying to find a primer that won't upset their skin but still does something.


3.5/5

Overall, my favourite primer this time round was the 'Skin WOW' by Seventeen and I'm still loving using the Smashbox primer from the previous Battle of the Primers. 

I hope this was helpful and if you have any questions or recommendations don't hesistate to comment! Please also don't forget to follow me on social media - I follow back!
Love,




My Favourite Cleansing Wipes, Ever.


Hey lovelies!
Today I thought I'd do a short and sweet post on a recent finding that has honestly changed my life!
A while back I picked up the Primark 'Skin Therapy Sensitive Skin Fragrance Free Face Wipes' (longest name ever) and honestly I was blown away by them. I usually hate makeup wipes as I feel they tug at the skin, don't effectively remove any of my makeup, aren't wet enough and leave my face red and stinging. But these wipes didn't do any of this!

First of all they were damp enough to effectively remove my makeup without having to tug and pull, especially around my eyes. Although I must mention I do go in and properly cleanse after using these. And, they're fragrance free so they didn't irritate my extremely sensitive skin. I must admit, I mainly use these in times where I'm rushing, on a journey and want to remove my makeup, or i'm slightly, very tipsy from a night out and don't know my left from my right - never mind go into a full 6 step skincare routine. I believe they're around the £1 margin so I honestly recommend picking up a packet when you next see them!


Thank you for reading,
Please don't forget to follow me on BlogLovin and everything else (i do follow back!),

Drugstore Haul featuring Kiko Cosmetics

Hey lovelies!
Today I thought I'd change up my blog posts a bit and instead of doing a product review I'd do a mini haul of products I've recently bought! This year I'm trying to limit how many new beauty items I buy, so I can limit how many products I actually own!

The Haul


So, the first place I went was Kiko, which has recently just opened in the past 3 months in my city centre so I was super excited to visit them after all the positive reviews they've been receiving over the past couple of weeks. I bought myself a highlighter stick, as even though I do own highlighters none are this type and it seems like a really easy and simple way to apply highlighter. It was called the 'Radiant Touch Creamy Stick Highlighter' (which is a hell of a long name), and was only £8.50! Which is amazing considering the Benefit 'Watts Up' is £24.50! I bought the shade '101 Rose' which is a pinky highlighter, and I only own one type of highlighter in the pinkish shade (instead of champagne) which is my Benefit 'High Beam', so I really wanted to give it a go as I find these type of shades look a lot more natural on me instead of the champagne shades.


The second thing I bought from Kiko was three of their 'Smart Lip Pencils' which are only £2.50 each! (Honestly amazing!) I bought the shades; 710 'Rouge Noir' which is a berry/wine colour and perfect for these winter months, 711 'Light Plum' which is as the name suggests a light plum, mauve-y colour and finally the shade 712 (honestly I didn't intentionally buy them in order) 'Rose Mauve' which is a mix between MAC's 'Soar' and 'Whirl' lip liner - perfect for that Kylie Jenner look. So far I've loved them! A review will be upcoming soon of the lip liners so look out for that! Also, if you scroll to the end of this blog post I did some swatches of the products!


From top to bottom: 711, 710, 712


The final few things I bought we're just some bits I'd mainly run out of. I repurchased my La Roche Posay Effaclar Duo [+] | Link,  which I honestly adore and have come to realise I can't live without. Then, I bought some Duo Striplash Adhesive white clear | Link, I haven't purchased this before but I hear so many positive reviews on it and there's been plenty of times I've bought lashes and come to realise it doesn't come with any lash glue! So, I'm then stuck with an open box of unused lashes but have no way of sticking them to my eyelid! Next, I bought some Tanya Burr Bambi Eyes Lashes | Link, as I haven't tried any of them yet! (Review upcoming). And finally, I bought myself my alltime favourite false eyelashes, Ardell Fashion Lashes Demi Black 101| Link.


Swatches


Thank you for reading lovelies,
please don't forget to follow me on Bloglovin to stay up to date with my posts or on any other of my social media which you can access on the left hand side of my blog,

Halloween Make-up Look {Drugstore}

Hey lovelies!
Today I thought I'd do a post showcasing what I got up to on my halloween! For any of you that don't know, I'm currently studying at university so halloween was a massive night that had pre-bought tickets sold waaay too early on.

A few photos of the night


My Make-Up Look

The Make-Up Look:

  1. Firstly I applied two primers to my face, to improve the appearance and longevity of my make-up during the sweat filled night. I applied the Becca 'Line and Pore Perfector' primer to my t-zone, and I applied the Nivea 'Daily Essentials Hydration Primer' for combination skin to my dehydrated cheeks.
  2. Second, I covered the dry-redness in my cheeks with Benefit's 'Fake Up' concealer in the shade 'Light'. Then, I evened out my skintone with Revlon's 'ColorStay Foundation' for combination/oily skin, in the shade 'Sand Beige'. I used the beauty blender to apply this.
  3. After letting my foundation set for about 5-10 minutes, I went in with some concealer to cover any breakouts and to cancel out my dark circles under my eyes, using Collection's 'Lasting Perfection Concealer' in the shade '2 Cool Medium'.
  4. Then, I lightly dusted my face with ELF's 'Tone Correcting Powder' in the shade 'Cool', using my sigma F30 powder brush.
  5. Fifth, I went in to do my brows. I firstly brushed them through with a spoolie and then used my Benefit 'Brow Zings' to do my brows, in the shade 'Medium., - using the brushes provided. Ultimately, to then set my brows I used Maybelline's 'Brow Drama' in the shade 'Medium Brown'.
  6. Then, next was the biggest step - eye makeup. Firstly, I primed my lids with Sigma's 'Eye Shadow Base' in the shade 'Persuade', using the sigma F70 concealer brush. Then, using my Naked 2 palette I mapped out my crease with the sigma E40 brush using the shade 'Tease'. Then, using my Naked 3 palette and my sigma E55 brush I applied 'Trick' to the whole of my lid, which is my all time favourite eyeshadow shade ever! Then, to darken up the crease using the E40 brush I applied MAC's 'Sketch' and also to the outer half of my eyelid. Ultimately, I blended all the shadows together with my MAC 217 brush and dusted on some MAC 'Nylon' eyeshadow as a highlighter on the brow bone and inner corner of my eye. Then, I tightlined my waterline using Rimmel's 'Scandal Eyes Waterproof Kohl Liner' in 'Black'. Then, I finally gave myself winged eyeliner using Soap And Glory's 'Supercat' liquid eyeliner in 'Black Extreme'.
  7. Finally, I was onto contouring. I started out using the Real Techniques contour brush with Bourjois' 'Bronzing Primer'. Then, to contour I used my Space NK cheek contour brush, with Benefit's 'Hoola Bronzing Powder', which I applied to the hollows of my cheekbones, temples and jawline. I then went in a blended the bronzer, and made sure I had no harsh lines left with my sigma F30 brush.
  8. Next, was blush and highlighter. I applied Barry M's blusher, in the shade 'BL4', to my cheeks using sigmas F40 brush. Secondly, to highlight I used Benefit's 'High Beam' on my cheekbones, and blended with my fingers. Then, to add a final highlight and set my make-up I dusted over my whole face using my F30 brush with Hourglass' 'Lighting Palette'.
  9. Finally, I swiped over my lips Tanya Burr's lipgloss in the shade 'Chic' and added some Ardell Demi false eyelashes to finish off the look.

I hope you enjoyed seeing a few photos from my night and liked my make-up look!
Thank you for reading and please don't forget to follow me on BlogLovin!
Also, don't hesitate to comment below with what you went as or did for Halloween! 
Victoria Louise x

Spring/Summer Daily Makeup Routine

Hey lovelies,
I thought I'd do a quick post on my makeup routine at the minute. This is what at the moment I've been swaying towards during the day, I obviously wear different makeup when I'm going out somewhere special or something longer wearing for work but this look is just so quick and easy that I'm sticking to it! I've listed what I use with the brushes I use them with and a link to buy each thing. Most of my brushes are from the brand Sigma, and as you can't buy the brand officially in the UK, I bought the beginners/essential kit here.

Here's a photo of the makeup look:

1) Firstly for my base I applied using my fingers my Seventeen Flawless Poreless Primer, I like this that it's skin coloured and I'd say it's similar to the Benefit one but for me doesn't quite come to par with my Smashbox primer.
2) Next, I applied my Bourjois 123 Perfect CC Cream in the shade 'Ivory' with my Cosmopolitan Beauty Blender. Now I find this is sadly still a tad bit too dark but I can get away with it. I adore how light this feels on the skin but I wish it would be a bit longer lasting but it does have SPF 15 which is a major bonus! Then to cover up any remaining spots using my fingers I applied my Collection Lasting Perfection Concealer in the shade 'Fair'. I just apply this under the eyes and on any spots, this doesn't need any comment as it is truly raved about in the beauty world and I can fully see why being on my 3rd tube.
3) Thirdly, I lightly dusted my face with ELF's Tone Correcting Powder in the shade 'Cool', using the Sigma Powder Brush/F20. I wouldn't say this is anything special but I like that it doesn't leave my makeup looking cakey.
4) Then I filled in my brows with Maybelline's Brow Drama in the shade 'Medium Brown'. I love how easy this is to use, and highly recommend anyone to try this who either is considering adding a brow product into their makeup routine or are thinking of purchasing Benefit's gimmie brow.
5) Moreover, I then filled in my crease with the bronzer from ELF's Contouring Blush and Bronzer Powder Duo in the shade 'St Lucia' using my Sigma Tapered Blending Brush/E40. Ultimately, leading me to curl my lashes with the Shu Uemura Lash Curler and then flick on some Maybelline Great Lash mascara.
6) Finally I applied some bronzer from the ELF duo to my cheek bones using Space NK's Cheek Contour Brush and lightly dusted on ELF's Blush in the shade 'Pink Passion' with my Real Techniques Blush Brush.

Thank you for reading lovelies!
Please don't hesitate to comment or follow me on BlogLovin!
Victoria Louise x

Valentines Day Tutorial {Drugstore}

Hey lovelies,

I thought I'd upload a valentines day make-up tutorial (there will be some outfit ideas at the bottom if any of you are super stuck!). This mainly contains drugstore products but I will leave a few options which you can swap. I've also added a picture of both my sister and I wearing the make-up look so you can see how it looks on people with different skin tones, especially as she's more warm toned and just a different face! I tried to make this look quite youthful and glowing as I wanted to express when you're in love everything seems that much brighter and better! Obviously, I included the colour pink, but not too worry if you're not a major fan of pinks it's a very neutral, light pink and compliments any eye colour - especially blue/green ones.

My sister
Close Up of the Eye Make-Up


Steps

  1. Firstly I applied a moisturiser with an SPF (as it's super important to protect your face!). I used Amie's 'Skin Shield', £5.95, although I'm not a major fan of this. 
  2. I applied a primer next to fill in any pores, lines and to maintain the fresh look. I used Seventeen's 'Flawless Poreless Primer', £5.99.
  3. Thirdly, I applied my foundation using my beauty blender into the skin to give a flawless, natural complexion. Even though I want a glowy look I tried to use a plain foundation as I like to control and add where the glow goes, if that makes any sense? Also, I wanted medium coverage to give that flawless look! I used Revlon's 'ColorStay Foundation' for combination/oily skin, £10.65. But if you want something more natural (maybe you already have perfect skin) I recommend Garnier's 'Daily All In One BB Cream' , £7.99.
  4. Next was concealer which I just covered any blemishes and used for my awful dark circles. I used Rimmel's 'Wake Me Up Concealer', £5.49.
  5. Powder is ultimately next and I used Rimmel's 'Stay Matte Pressed Powder', £3.99.
  6. Sixth, is the dreaded brows! I used a spoolie brush to brush them through and then using an angled eye brush I applied brow powder to fill them in but maintain the texture keeping them as natural as possible. I used ELF's 'Studio Eyebrow Kit', £3.75.
  7. Next is the eye's and this is quite an extensive list and I will try my best to describe how I created the look! First I applied a base to hide my vein-ey eyelids and to enhance the eyeshadows, I used Benefit's 'Creaseless Cream Eyeshadow' in 'RSVP', £15.50. Then I went on to use Sleek's 'I-Divine' Eyeshadow Palette in 'Oh So Special', £7.99.Firstly, using a sigma flat shader brush I applied 'Bow' (the white colour) as a highlighter on my brow bone and the inner corners of my eye. Secondly, using the same brush I applied the light, shimmery pink next to 'Bow' called 'Organza' on the inner third of my eye - just until your pupil starts. Thirdly, I applied the other darker, shimmery pink below 'Organza' called 'Gateau' using the same brush to the rest of my eye. Then using a crease brush I used both of the matte pinks (very lightly), called 'Ribbon' and 'Pamper' as a transition colour and to soften the look. Finally using a blending brush I blended all the eyeshadows together!
  8. Now, I added a flick using a black liquid eyeliner (you don't have to if you don't want to) using Kat Von D's 'Tattoo Liner' in 'Trooper' for $18, a cheap alternative is Maybelline's 'Precise Liner' for £5.99.
  9. Then to contour I used the brush that comes with Benefit's Hoola bronzer with ELF's 'Contouring Blush & Bronzing Powder' in 'St. Lucia' for £3.75. I didn't use this to warm up the face it was just to give a very light definition, of which I applied in the hollows of my cheeks (yes you have to make the stupid duck face).
  10. Next, I added a light pink to my cheeks, I used Benefit's 'Posietint' as it's a tint so it lasts ages and looks extremely natural, for £24.50. But, if you're finding you want something cheaper and still natural I recommend a cream blush such as Topshop's in 'Afternoon Tea' for £6.00.
  11. Now, ultimately add a bit more glow with highlighting, I applied this just on the tops of my cheek bones, I used Topshop's 'Glow Highlighter' in 'Polish' for £9.00. As it's a cream I feel it looks more natural and pigmented than a powder.
  12. Second to last, is lips and I have a few options. You can either have a very natural lip (which both me and my sister are rocking) using a pink tinted lip balm, for example Maybelline's 'Baby Lips' in 'Pink Punch' for £2.99. Or, you could gloss it up with a nice pink lipgloss, such as Avon's 'Plump Pout Lipgloss' in 'Pink Pucker' for £2.99. Or, you could dramatize the look by adding a dark wine coloured lipstick, i.e. Topshop's lipstick in 'Beguiled' for £8.
  13. Finally, is eyelashes! Now I didn't add any fake eyelashes but you're welcome to, I'd probably sway for something quite romantic and fluttery. But mascara wise I tried to use a thickening mascara to give a wide-eyed, fluttery, romantic kind-of-look. I used, Max Factor's 'Clump Defy Mascara' in Black for £10.99.
Valentines Day Oufit Ideas

Thank you for reading lovelies,
Sorry the list was quite long but I wanted to make sure it was detailed enough so that anyone could follow it easily and you had options if you wanted to try something different!
Please comment if you gave it a go or tweet me a picture (@SmallFry_xox), also please subscribe and follow me on BlogLovin!
Victoria Louise x

Here's me with the same makeup look but with a dark colour through the crease 


YouTube Channel

Hey lovelies!

Well I have a few posts today but my most exciting news to share with you, which was featured in my previous post here, is that I'm starting a Beauty YouTube channel with my friend Lucy! We will be uploading multiple videos ranging from winter must haves to challenges!

I'd love it if you checked it out, it's called T 'n' L, standing for Tori 'n' Lucy! We've already uploaded two videos which I shall post in this blog post, but you can just click the link here to subscribe. (Which would be super nice!)


We love receiving comments on our videos or even tips as we no-where near class ourselves as vlogging proffessionals!
Thanks for reading, please subscribe, comment with your YouTubes I should check out and follow me on BlogLovin!
Victoria Louise x

iTunes Festival

Hey lovelies!
Well today I thought I'd post quite a massive post but it's also massively exciting - so worth it, right?!

My Experience

Earlier this month I got notified that I won tickets to the iTunes Festival, which is amazing in itself, to see Lawson and Jessie J perform live at the Roundhouse in London! I was completely blown away by the fact I won tickets to this as it's such a slim chance and the fact the tickets are free is even better! The concert was brilliant and we were super close to the stage, so if anyone gets the opportunity to go next year, do not turn it down! I adored it so much I still have the wrist band on that you're given to enter, slightly obsessive I know. Here is a little collage of some of the photos I took as I didn't take many as I was busy having fun!
I posted this on my instagram, which you can view here.


What I Wore

I didn't go for anything really fancy, as I was travelling to London and back all in one day whilst going to a concert so I needed to be comfy! But I still wanted to look like I'd made some sort of effort, which was why I chose to why a loose/skater fit skirt. Here's a picture of what I wore:

I decided to wear:
  • A light,quilted jacket (mine was from Primark, was about £15 and is about 3 years old!) Similar coats, £89.95 and £29.99.
  • A basic black strappy vest top under a black button up chiffron shirt. (Both of these are also from Primark, as I normally wear these two pieces as my work uniform but they go well with anything) £3.00 - an example of my shirt.
  • Tartan skirt from New Look for £17.99. Tartan is also in at the minute, something I'd previously mentioned in my outfit of the month post , which is great!
  • I teamed this with some simple black tights and my white converse, which are £45.00.

My Make-Up

For my make-up I wanted something that would last the entire day and not slide off my face once I got all hot and sweaty during the concert. I also wanted something pretty and dressy - as I needed to look my best for Jessie J, right?
  1. Firstly I applied my primer, which at the moment is the W7 'Prime Magic Anti-Redness'. I used this to hide any redness, prime my face and allow my make-up to last longer.
  2. Secondly, I applied my foundation which is Revlon's 'ColorStay' (Combination Formula) in Shade 'Sand Beige' with a beauty blender. This is so long lasting and gives amazing coverage - perfect for a long, busy day.
  3. Thirdly, I applied a quick bit of ELF's 'Tone Correcting Powder' to help set my foundation and make it easier for my concealer to last.
  4. Next comes my concealer, which I applied to any spots and under my eyes. I used Rimmel's 'Wake Me Up' concealer.
  5. Fifthly, I brushed on my Maybelline 'Fit Me Powder' to give colour back to my face and to make sure my foundation lasts as long as possible. 
  6. Then I applied Rimmel's 'Exaggerate Eye Primer' to allow my eye make-up to last as long as possible without creasing. Whilst I let that set, I filled in and shaped my eyebrows with ELF's 'Brow Duo' and Rimmel's 'Eye-Brow Pencil'. As the pencil helps me shape them whilst the powder fills in any gaps.
  7. I then brushed through my brows with ELF's 'Clear Mascara & Brow Duo'
  8. Next is eyeshadow... I used my favourite eyeshadow palette ever, which is avons, I used '1' in the inner corners of my eye and to highlight under my eyebrows, '2' on the whole lid and '3' in the crease which I then blended all together.
  9. Then I created a flick and lined my eyes with my Maybelline gel eyeliner in a brown and used Garniers eye roll on under my eyes to highlight.
  10. Then I bronzed in my cheek bones using ELF's 'St Lucia' duo and used Maybelline's blush on the apples of my cheeks.
  11. Finally I coated my eyelashes with some mascara, Maybelline's 'One by One' volume mascara and swiped my lips with my Nivea lip butter.
I hope you enjoyed this post, apologies for it being so long! Please comment below with your favourite concerts or outfit/make-up ideas for a concert as I'd love to hear them! Also please susbcribe/follow me On BlogLovin' as I follow back!
Victoria Louise x

Benefit - 15% Off


Hey,
I thought I'd just do a quick post, although it's mainly a notification that Benefit has 15% off online on their UK store which ends this Sunday. So I really recommend checking it out as it's on EVERYTHING and I personally adore the brand so I can fully admit I went a bit crazy, there will be a post featuring what I've bought later on.
The code is PAYDAY.


Victoria Louise x